Create a Virtual Hard Drive in Windows – Step by Step

As I’m sure you know, a hard drive is used to store datainformation on your computer so you can access it as needed. This data can be files such as pictures, documents, music and the files that are used to by the programs that allow you to open these files. Your operating system (Windows) files are also stored on your hard drive.
Many people like to have a secondary drive to keep their important files away from the operating system disk for organizational or size requirement purposes. Another reason is that if your operating system were to fail and you needed to reinstall or format the drive then your data would be unaffected and safe on your other drive.
If you don’t have a secondary physical drive there is always the option to partition your primary drive and have a secondary drive that is separate yet still part of the same physical hard drive. This will still let you do the things mentioned above but won’t protect you in the event of a hard drive failure since both partitions are on the same physical drive.
So what if you want to make separate drive for organizational or testing purposes etc. but have already installed Windows on your existing drive and have it partitioned the way you want it? If that’s the case then you can create a virtual disk using the existing space on your hard drive. A virtual disk will act as a standalone disk that you can format and assign a drive letter to just like you added another physical disk in your computer but will actually use the disk space on your current hard drive. This comes in handy for experimenting with virtual machines and other virtualization testing.
In order to create a virtual drive you will need to go into Disk Management which you can find by right clicking Computer and choosing Manage or by typing diskmgmt.msc in the run box. When Disk Management opens up it will show all the drives attached to your computer including your CDDVD drive and any USB drives you have connected. Our example will look different from what you see on your computer.
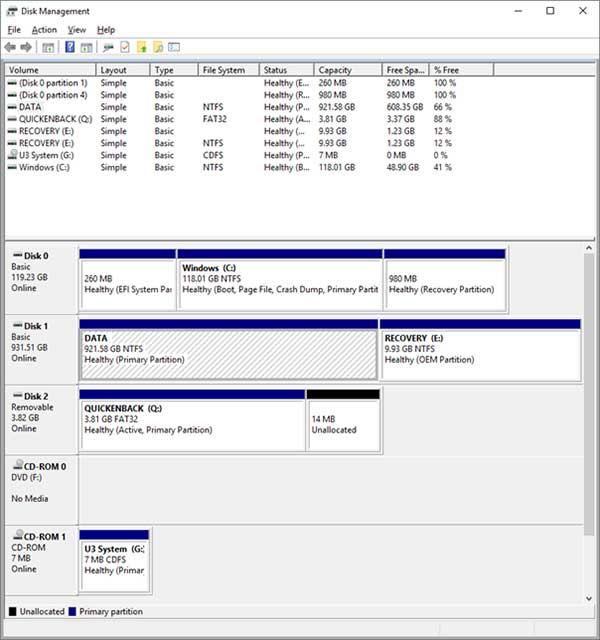
In our example we have a second physical drive called DATA and that is where we are going to make our virtual disk. To create the virtual disk click on the Action menu and then Create VHD. You will see the following dialog box where you will have to make your selection based on what type and size disk you want to create.
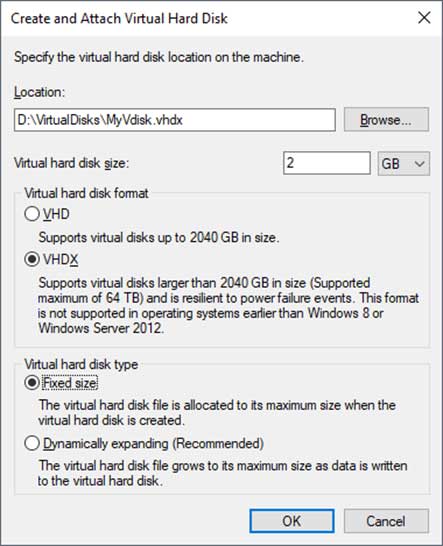
If your virtual disk is going to be more than 2TB then you will need to choose the VHDX option but it may be a good idea to choose VHDX because it’s the newer format and has other benefits but make sure you are on Windows 8 or higher so its supported. As for fixed vs dynamically expanding that is up to you because a fixed disk will use all the space on your physical hard disk when its created while a dynamic disk will use up space on your physical hard drive as you fill up your virtual disk.
You will also need to choose a location on your physical disk to store the virtual disk. You can browse to a location and create a folder if you plan on having multiple virtual disks. Then you will need to choose a size for the disk in either MB, GB or TB which can be changed from the drop down menu.
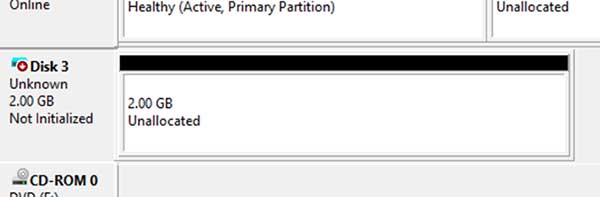
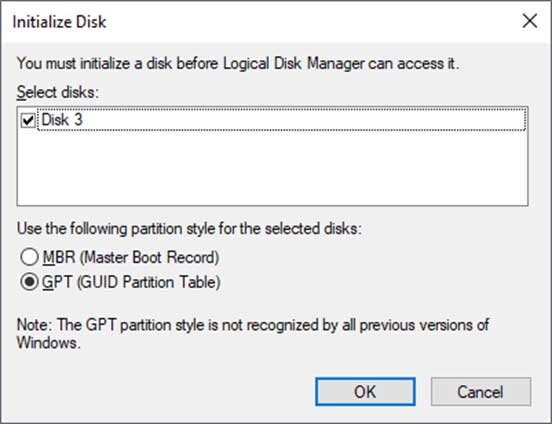
Once you create your virtual disk you will see it appear in Disk Management as unknown and not initialized. All you need to do is right click on the grey area where it says Unknown and choose Initialize Disk and you can leave it on GPT and click OK.
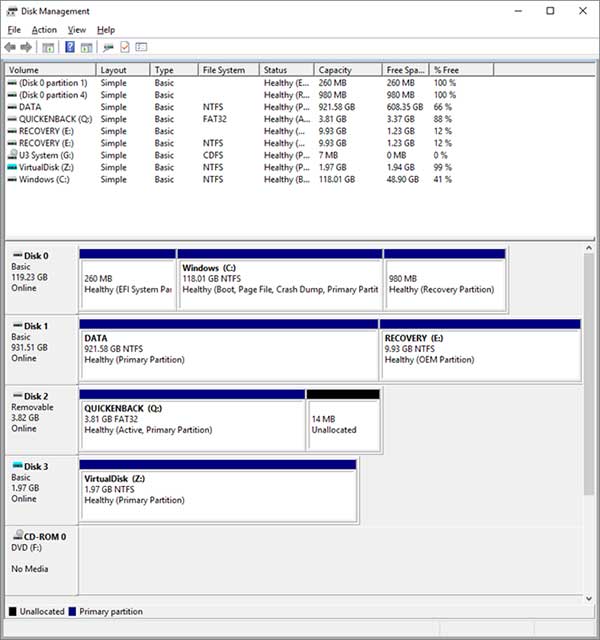
Next you will click on the white space on the drive and choose New Simple Volume and allocate the amount of space you desire to the disk based on the total size you created it with, assign it an unused drive letter and give it a volume name and use the quick format option. We called ours VirtualDisk and gave it the drive letter Z and now it appears as a formatted disk in Disk Management.
If you open Windows Explorer and look in the folder you created the drive in you will notice that there is a vhd or vhdx file with the name you gave it during its creation. You will also notice you have another drive with the new drive letter you gave it. Now you can use this drive to store files or attach it to a virtual machine and so on. If you decide later on that you don’t want to use this drive anymore simply go back to Disk Management and right click your virtual disk in the grey area and choose Detach VHD or Detach VHDX depending on the type of disk you created. Then you can go back to the folder you stored the virtual disk in and delete the file which will deleted whatever files you had added to it while using it. You can also detach the disk, put it on a flash drive (size permitting) and place it on another computer and attach to it from the other computer.