
Last Updated on March 16, 2026
Windows has had built in screensavers since the beginning of Windows and if you have ever played around with them you might have noticed that you can configure a slideshow screensaver that uses pictures off of your computer. Keep in mind that this is different from the desktop background slideshow where your desktop picture would change at certain intervals. The screensaver slideshow was very easy to setup and worked very well. But of course Microsoft likes to change things around on us to keep us on our toes! With newer builds of Windows 10 such as the Creators Update or later Microsoft made even more changes to try and confuse us and you usually don’t know what they are until you need to do something and it’s not the way it used to be.

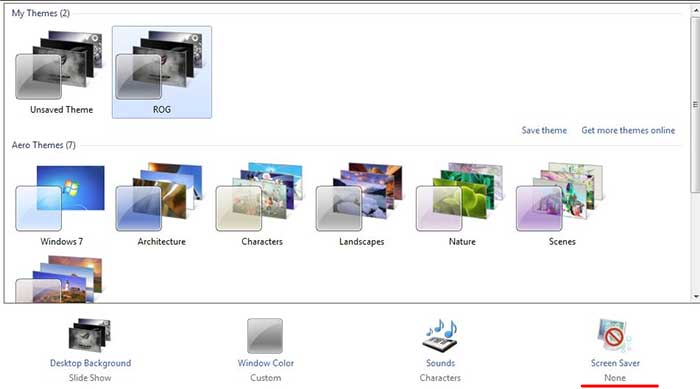
Screensavers should not be something that is difficult to figure out how to configure especially since it was so easy in the “old days”. But if you want to sell new versions of software it appears you need to make things different to justify it as an upgrade. When Windows 7 came out there were a lot of differences compared to Windows XP and that included a change in how you configure your screensaver among a lot of other things but that was still pretty easy to do. All you needed to do was right click on your desktop and choose Personalize. Then you could click on the Screensaver icon and take care of business. This continued for Windows 8 and maybe even earlier versions of Windows 10 but then things had to change again and it’s almost like they didn’t want you to use screensavers anymore.
Windows 7 & 8 screensaver settings
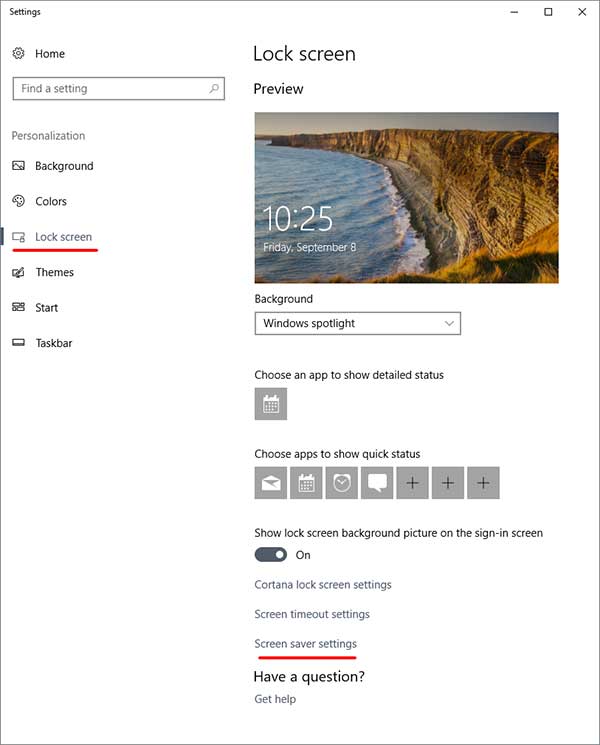
You can still configure the screensaver slideshow but it just takes a few more steps to get there and you have to figure out what you need to click on in order to find it. You still start off by right clicking the desktop and choosing Personalize. Then you need to click on Lock Screen and then Screen saver settings.
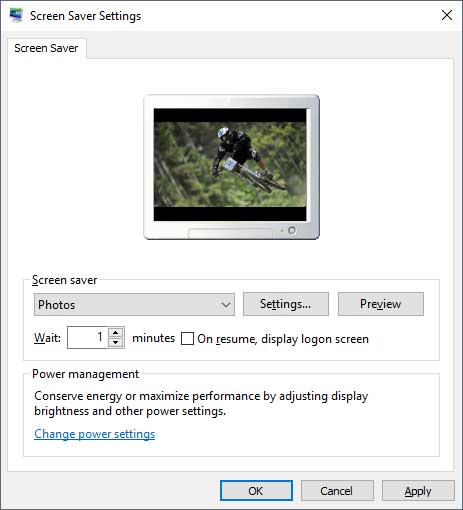
Then you will see the old school Windows screen saver settings box. Next under the Screen saver drop down choose Photos and click on the Settings button to configure the slideshow.
From the settings you can choose the slide show speed from slow, medium and fast and if you want the pictures shuffled then check the Shuffler pictures check box. To choose what photos will be in your slideshow click on the Browse button and navigate to the folder that contains your pictures.
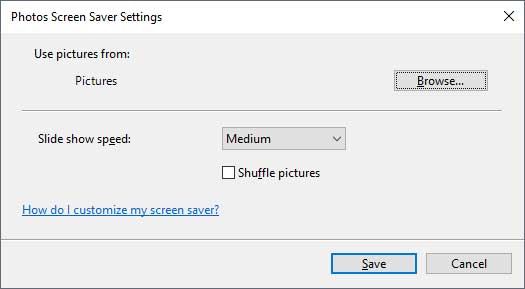
Keep in mind that it will use all the pictures that are in that folder so if there are some you don’t want used as a screensaver then you need to remove them from that folder. One thing you can do is create a new folder and copy all the pictures you want to use into that folder and then browse to that folder in the settings.
For additional training resources, check out our online IT training courses.
Check out our extensive IT book series.


